netgear ex3110 setup mywifiext.net

How to configure Netgear Extender using mywifiext.net?
This section includes the steps to configure the Netgear Range Extender using mywifiext.net. Hence, the users are suggested to go through the following points for the same. Firstly, the users should plug in the Netgear Range Extender into a power outlet. When the users perform the range extender’s setup process, they are suggested to make sure that it is on factory default settings. Note: The factory default settings mean that users only have the solid power light on the Netgear Range Extender. Once the users have solid, stable light or solid green light on the range extender, they should connect their mobile phone or PC to the range extender. Note: The users can connect their PC/mobile phone wirelessly via Netgear_EXT. The users can also connect the ethernet cable directly from their range extender to their router. The users are now suggested to open the mywifiext.net web page. Once the users are on the web page, it will direct them to “New Extender Setup.” Therefore, the users must carefully follow the steps given above to configure the Netgear using mywifiext.net.
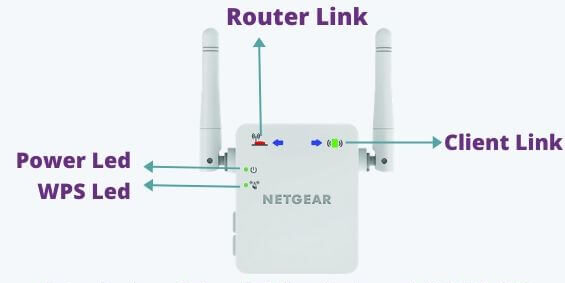
What does the light mean on Netgear router and Extender
- Led lights to determine the connection between your router and the connected devices. They also tell us about various other things like the ethernet network, wifi, WPS, internet connection, etc
- No led light means the device is off
- Solid orange means that the device is booting.
- Solid green or white means that your network device is ready for being used
- Solid amber/Orange mean that the router is powering on
- Blinking light means your router firmware is corrupted
Netgear Wifi Extender Setup Using WPS Method
WPS or Wifi Protected Setup is a simpler way of installing the Netgear Wifi Extender. The following steps will guide you with the setup:
Firstly, ensure to power the extender sufficiently.
Now, find the WPS button on your extender for a few seconds.
Next, push the WPS button of your wifi router.
The LED on the extender will turn solid green, indicating that the router is paired with the extender.
Furthermore, for dual bandwidth, you can repeat the same procedure.
You can now move your extender to the location where you want proper internet connectivity.
Not able to log in and access the configuration page of Netgear troubleshoot
You may face different kinds of problems while accessing the Mywifiext or the configuration page of Netgear. A few of the most common errors may include the browser cache, IP address, and many others. However, you can resolve this issue easily and gain access to the configuration page by following the steps mentioned below:- Firstly, make sure that the router and mywifiext extender are kept in the same room at the appropriate distance. Also, connect the extender to a power source and check if the LED light starts flashing on the device. When you cannot log in to the mywifiext page, you should contact the specialist for a quick solution via call. After this, you are recommended to create a connection between your Wi-Fi extender and laptop or computer. In the end, you should set one static IP address for this system. Here we have provided some essential details on the Netgear extender, including its setup procedure via mywifiext. In addition to this, we have also discussed how it works to increase your internet speed miraculously. Moreover, we added how you can access the mywifiext setup page without any issue.

Unable to access the Netgear extender using mywifiexts.online
How to Perform Netgear EX3110 Setup in a Hassle-Free Manner
Struggling with the Netgear EX3110 setup? Not anymore! This post will be your guide to perform the Netgear AC750 EX3110 WiFi range extender setup in a hassle-free manner. Read on.
Netgear EX3110 AC750 dual-band WiFi range extender boosts your existing network range and delivers AC WiFi up to 750 Mbps. Ideal for online gaming and HD video streaming, the EX3110 extender can work with any standard WiFi router. Furthermore, it provides support for FastLane technology, creating one super high-speed connection using both WiFi bands.
Without further ado, let’s get to know how to set up Netgear EX3110 AC750 WiFi range extender without any issue.

Netgear MyWiFi Extender EX3110 Setup
Steps for mywifiext.net login
Step-by-Step Guide for mywifiext.net Login
Step-1:
After unboxing, plug in your WiFi range extender to an electrical outlet.
Step-2:
Turn on your PC or laptop.
Step-3:
Launch a web browser on it.
Step-4:
Type www.mywifiext.net in the address bar.
Step-5:
Cross-check the entered mywifiext net details and press the Enter key.
Step-6:
Input the username and password carefully. Once done, click on the Log In button.
After mywifiext net setup success, access the WiFi network. Once done, you will get seamless internet speed throughout the home on all your devices. If you stuck at any step, you can anytime contact our experts for personal and immediate assistance.

Chat with our technical engineer to get your
issue resolved
Can’t Access Mywifiext.net?
Extender Device Light Not On
Does your WiFi range extender keep showing the red light? Well, ignoring this issue can put an adverse effect on your extender from degrading its performance to losing connection and ultimately the mywifiext.net not working. So before a big mishap happens, troubleshoot this issue as soon as possible.
Problems with Extender Lights: What’s the Reason?
- No extender MAC address
- Inaccurate location of the extender
- Congested WiFi channels
- Obsolete firmware version
- Incorrect mywifiext net web login details
- An issue with the internet connection

Mywifiext net Not Working
Sometimes what happens is that when you log into the http://mywifiext-local web address, you get an error message saying mywifiext net not working or can’t connect to it.
Why doesn’t Mywifiext Work?
It generally happens due to a weak physical connection between the extender and the existing router. What’s more, it is a local web address rather than a regular internet website. So you can get errors if you access it with a spotty or intermittent WiFi connection. Another possible reason is that perhaps you have mistyped the mywifiext web address or entered it into the search bar. If you are using a MAC then also mywifiext.net will not work. For that, you need to use http://mywifiext-local to get login success.
The Ultimate Fix
To get rid of this issue, follow the steps given here:
- Connect your extender and router properly.
- Cross-check the web address you entered.
- Keep the extender away from PCs, cell phones, fax machines, ovens, etc.
- Delete the cache and cookies of your web browser.
- Re-check the wired or wireless connections.
Setup Netgear range Extender - Step By Step Guide
There are two widely used methods to Setup your extender using mywifiext.net
1. Manual Method
This method is also commonly known as a web browser setup. Below is the step by step instructions to setup your extender device.
- Turn on your extender by plugging it into the power socket.
- Connect your extender with the wifi device.
- It’s time to launch the network Manager and connect it to netgear_ext network
- Open the web browser of your choice (Firefox/Chrome recommended)
- Go to the website by entering the site URL mywifiext login page in your preferred browser. In case you find any issue feel free to chat for instant solution.
- Create a new account in case you don’t have an account already.
- Log in using your account username and password
- Choose the network you wish to extend from the given list.
- Click on the Next button on the screen
- The last step is to click on the Finish button
- Congrats! you had successfully setup your Extender, Feel free to place it anywhere you want, Still stuck at any step call our award-winning support at chatting

Looking For Help ?
Mywifiext net Login Issues
- Improper WiFi signal
- Router configuration issues
- Pre-shared key and SSID Issue
- Problems with LAN card
- Corrupted Internet exe file
- Outdated firmware version
- Issues with your web browser
- Intermittent wireless connection
Can’t access Mywifiext?
- Mywifiext keeps popping up
- Unable to access the extender’s login page
- The www mywifiext net setup wizard not opening
- Can’t find the server
- http://mywifiext-local website can’t be reached
- Can’t get mywifiext local set up success
- Mywifiext setup web page cannot be found
- The page keeps asking for username and password
- Can’t login to the WiFi extender